Citrix and Cisco

The rumor mill turns out to be pretty accurate. Cisco announced today in Spain that they’re partnering with Citrix for a number of items, including integrating NetScaler as their next generation load balancer in with other network services (vWAAS, ASA, Nexus 1000v). Citrix has also announced a trade-in program called AMP to help with/encourage migration to NetScaler. It looks like Citrix will be taking the reigs, and it’s mostly a Citrix sale/deployment.

The announcement was light on details, and many questions remain. Will it be an OEM deal? Just a reseller deal, or “hey go talk to Citrix and buy their stuff”. Will it involve their physical devices or virtual appliance (I suspect both).

So for the first time in almost 15 years, Cisco is not in the load balancer business.

Latest Rumors: Cisco to license/puchase NetScaler?

I feel like I’ve become the TMZ of Cisco load balancer gossip, and as much as I’d like to stop, I’ve got some more rumors for y’all.

Cisco! Cisco! Cisco! Is it true you’re having a love child with Citrix?

I’ve heard from a number of unofficial non-Cisco sources that Cisco is in talks to do something with NetScaler, and something will be announced soon. Some of the stock analysis sites (which first reported the impending death of ACE) have picked up the rumors, and so has Network World.

The rumors have been anything from Cisco buying NetScaler from Citrix to an OEM agreement, to a sales agreement where Cisco sales sells Citrix as part of their data center offerings. So we’ll see what happens.


As The Datacenter Turns…

This whole ACE thing has had more twists and turns than a daytime soap opera, or perhaps a vampire franchise on the CW aimed at teens and young adults. And things keep getting more interesting. Greg Ferro recently talked to a Cisco official about the ACE, a discussion I believe started by a comment over at Brad Casemore’s blog by a Cisco representative insisting that no, ACE is not dead. Meanwhile, the folks over at Cisco WAAS are very eager to let you know that they have a pulse, and aren’t going anywhere. This seemed necessary as WAAS has been long associated with ACE (I think they shared a business unit at one point), and has been eyed as another potential Cisco market exit. Plus it didn’t help that the WAAS group has recently been rumored to have had massive layoffs.

Calculon on learning the ACE, his fiance, is on life support, and is actually his sister. Also, double-amnesia.

With the ACE in abandoned-but-not-discontinued limbo, speculating is rampant about Cisco’s next move. I think they’re still working on what do to next, and I think the ACE discontinuation got outed quicker than they expected (again, no inside knowledge here). They could do what Juniper did, and just drop out entirely and partner with vendors that have a better product. The obvious partnership would be F5, assuming Cisco could swallow its pride. A10 is another, and also a purchase target since they’re privately held, though I think neither are likely. There are a lot of Riverbed Stingray fans showing up in the comments section of mine and other articles, but since Cisco is still actively competing with Riverbed in the WOC space, that seems especially unlikely. They could end up buying a part of another company, such as Citrix’s NetScaler business. Radware could also be purchased, but they have near zero footprint in the US, and not a great reputation. We’ll have to wait and see, I’m sure there will be more twists and turns.

Requiem for the ACE

Ah, the Cisco ACE. As we mourn our fallen product, I’ll take a moment to reflect on this development as well as what the future holds for Cisco and load balancing/ADC. First off, let me state I have no inside knowledge of what Cisco’s plans are in this regard. While I teach Cisco ACE courses for Firefly and develop Firefly’s courseware for both ACE products and bootcamp material for the CCIE Data Center, I’m not an employee of Cisco and have no inside knowledge of their plans. As a result, I’ve no idea what Cisco’s plans are, so this is pure speculation.

Also, it should be made clear that Cisco has not EOL’d (End of Life) or even EOS’d (End of Sale) the ACE product, and in a post on the CCIE Data Center group Walid Issa, the project manager for CCIE Data Center, made a statement reiterating this. And just as I was about to publish this post, there’s a great post by Brad Casemore also reflecting on the ACE, and there’s an interesting comment from Steven Schuchart of Cisco (analyst relations?) making a claim that ACE is, in fact, not dead.

However, there was a statement Cisco sent to CRN confirming the rumor, and my conversations with people inside Cisco have confirmed that yes, the ACE is dead. Or at least, that’s the understanding of Cisco employees in several areas. The word I’m getting will be bug-fixed and security-fixed, but further development will halt. The ACE may not officially be EOL/EOS, but for all intents and purposes, and until I hear otherwise, it’s a dead-end product.

The news of ACE’s probable demise was kind of like a red-shirt getting killed. We all knew it was coming, and you’re not going to see a Spock-like funeral, either. 

We do know one thing: For now at least, the ACE 4710 appliance is staying inside the CCIE Data Center exam. Presumably in the written (I’ve yet to sit the non-beta written) as well as in the lab. Though it seems certain now that the next iteration (2.0) of the CCIE Data Center will be ACE-less.

Now let’s take a look down memory land, to the Ghosts of Load Balancers Past…

Ghosts of Load Balancers Past

As many are aware, Cisco has long had a long yet… imperfect relationship with load balancing. This somewhat ironic considering that Cisco was, in fact, the very first vendor to bring a load balancer to market. In 1996, Cisco released the LocalDirector, the world’s first load balancer. The product itself sprung from the Cisco purchase of Network Translation Incorporated in 1996, which also brought about the PIX firewall platform.

The LocalDirectors did relatively well in the market, at least at first. It addressed a growing need for scaling out websites (rather than the more expensive, less resilient method of scaling up). The LocalDirectors had a bit of a cult following, especially from the routing and switching crowd, which I suspect had a lot to do with its relatively simple functionality: For most of its product life, the LocalDirector was just a simple Layer 4 device, and only moved up the stack in the last few years of its product life. While other vendors went higher up the stack with Layer 7 functionality, the LocalDirector stayed Layer 4 (until near the end, when it got cookie-based persistence). In terms of functionality and performance, however,  vendors were able to surpass the LocalDirector pretty quickly.

The most important feature that the other vendors developed in the late 90s was arguably cookie persistence. (The LocalDirector didn’t get this feature until about 2001 if I recall correctly.) This allowed the load balancer to treat multiple people coming from the same IP address as separate users. Without cookie-based persistence, load balancers could only do persistence based on an IP address, and was thus susceptible to the AOL megaproxy problem (you could have thousands of individual users coming from a single IP address). There was more than one client in the 1999-2000 time period where I had to yank out a LocalDirector and put in a Layer 7-capable device because of AOL.

Cookie persistence is a tough habit to break

At some point Cisco came to terms with the fact that the LocalDirector was pretty far behind and must have concluded it was an evolutionary dead end, so it paid $6.7 billion (with B) to buy ArrowPoint, a load balancing company that had a much better product than the LocalDirector. That product became the Cisco CSS, and for a short time Cisco was on par with other offerings from other vendors. Unfortunately, as with the LocalDirector, development and innovation seemed to stop after the purchase, and the CSS was forever a product frozen in the year 2000. Other vendors innovated (especially F5), and as time went on the CSS won fewer and fewer deals. By 2007, the CSS was largely a joke in load balancing circles. Many sites were happily running the CSS of course, (and some still are today), but feature-wise, it was getting its ass handed to it by the competition.

The next load balancer Cisco came up with had a very short lifecycle. The Cisco CSM (Content Switch Module), a load balancing module for the Catalyst 6500 series, didn’t last very long and as far as I can remember never had a significant install base. Also, I don’t recall ever using, and know it only through legend (as being not very good). It was replaced quickly by the next load balancing product from Cisco.

And that brings us to the Cisco ACE. Available in two iterations, the Service Module and the ACE 4710 Appliance, it looked like Cisco might have learned from its mistakes when it released the Cisco ACE. Out of the gate it was a bit more of a modern load balancer, offering features and capabilities that the CSS lacked, such as a three-tired VIP configuration mechanism (real servers, server farms, and VIPs, which made URL rules much easier) and the ability to insert the client’s true-source IP address in an HTTP header in SNAT situations. The latter was a critical function that the CSS never had.

But the ACE certainly had its downsides. The biggest issue is that the ACE could never go toe-to-toe with the other big names in load balancing in terms of features. F5 and NetScaler, as well as A10, Radware, and others, always had a far richer feature set than the ACE. It is, as Greg Ferro said, a moderately competent load balancer in that it does what it’s supposed to do, but it lacked the features the other guys had.

The number one feature that keeps ACE from eating at the big-boy table is an answer to F5’s iRules. F5’s iRules give a huge amount of control over how to load balance and manipulate traffic. You can use it to create a login page on the F5 that authenticates against AD(without ever touching a web server), re-write http:// URLs to https:// (very useful in certain SSL termination setups), and even calculate Pi everytime someone hits a web page. Many of the other high end vendors have something similar, but F5’s iRules is the king of the hill.

In contrast, the ACE can evaluate existing HTTP headers, and can manipulate headers to a certain extent, but the ACE cannot do anything with HTTP content. There’s more than one installation where I had to replace the ACE with another load balancer because of that issue.

The ACE never had a FIPS-compliant SSL implementation either, which prevented the ACE from being in a lot of deals, especially with government and financial institutions. ACE was very late to the game with OCSP support and IPv6 (both were part of the 5.0 release in 2011), and the ACE10 and ACE20 Service Modules will never, ever be able to do IPv6. You’d have to upgrade to the ACE30 Module to do IPv6, though right now you’d be better off with another vendor.

For some reason, Cisco decided to make use of MQC (Module QoS CLI) as the configuration framework in the ACE. This meant configuring a VIP required setting up class-maps, policy-maps, and service-policies in addition to real server and server farms. This was far more complicated than the configuring of most of the competition, despite the fact that the ACE had less functionality. If you weren’t a CCNP level or higher, the MQC could be maddening. (On the upside, if you mastered it on the ACE, QoS was a lot easier to learn, as was my case.)

If the CLI was too daunting, there was always the GUI on the ACE 4710 Appliance and/or the ACE Network Manager (ANM), which was separate user interface that ran on RedHat and later became it’s own OVA-based virtual appliance. The GUI in the beginning wasn’t very good, and the ACE Service Modules (ACE10, ACE20, and now the ACE30) lacked a built-in GUI. Also, when it hits the fan, the CLI is the best way to quickly diagnose an issue. If you weren’t fluent in the MQC and the ACE’s rather esoteric utilization of such, it was tough to troubleshoot.

There was also a brief period of time when Cisco was selling the ACE XML Gateway, a product obtained through the purchase of Reactivity in 2007, which provided some (but not nearly all) of the features the ACE lacked. It still couldn’t do something like iRules, but it did have Web Application Firewall abilities, FIPS compliance, and could do some interesting XML validation and other security. Of course, that product was short lived as well, and Cisco pulled the plug in 2010.

Despite these short comings, the ACE was a decent load balancer. The ACE service module was a popular service module for the Catalyst 6500 series, and could push up to 16 Gbps of traffic, making it suitable for just about any site. The ACE 4710 appliance was also a popular option at a lower price point, and could push 4 Gbps (although it only had (4) 1 Gbit ports, never 10 Gbit). Those that were comfortable with the ACE enjoyed it, and there are thousands of happy ACE customers with deployments.

But “decent” isn’t good enough in the highly competitive load balancing/ADC market. Industry juggernauts like F5 and scrappy startups like A10 smoke the ACE in terms of features, and unless a shop is going all-Cisco, the ACE almost never wins in a bake-off. I even know of more than one occasion where Cisco had to essentially invite itself to a bake-off (which in those cases never won). The ACE’s market share continued to drop from its release, and from what I’ve heard is in the low teens in terms of percentage, while F5 has about 50%.

In short, the ACE was the knife that Cisco brought to the gunfight. And F5 had a machine gun.

I’d thought for years that Cisco might just up and decide to drop the ACE. Even with the marketing might and sales channels of Cisco, the ACE could never hope to usurp F5 with the feature set it had. Cisco didn’t seem committed to developing new features, and it fell further behind.

Then Cisco included ACE in the CCIE Data Center blueprint, so I figured they were sticking with it for the long haul. Then the CRN article came out, and surprised everybody (including many in Cisco from what I understand).

So now the big question is whether or not Cisco is bowing out of load balancing entirely, or coming out with something new. We’re certainly getting conflicting information out of Cisco.

I think both are possible. Cisco has made a commitment (that they seem to be living up to) to drop businesses and products that they aren’t successful in. While Cisco has shipped tens of thousands of load balancing units since the first LocalDirector was unboxed, except for the beginning they’ve never led the market. Somewhere in the early 2000s, that title belong almost exclusively to F5.

For a company as broad as Cisco is, load balancing as a technology is especially tough to sell and support. It takes a particular skill set that doesn’t relate fully to Cisco’s traditional routing and switching strengths, as load balancing sits in two distinct worlds: Server/app development, and networking. With companies like F5, A10, Citrix, and Radware, it’s all they do, and every SE they have knows their products forwards and backwards.

The hardware platform that the ACE is based on (Cavium Octeon network processors) I think are one of the reasons why the ACE hasn’t caught up in terms of features. To do things like iRules, you need fast, generalized processors. And most of the vendors have gone with x86 cores, and lots of them. Vendors can use pure x86 power to do both Layer 4 and Layer 7 load balancing, or some like F5 and A10 incorporate FGPAs to hardware-assist the Layer 4 load balancing, and distribute flows to x86 cores for the more advanced Layer 7 processing.

The Cavium network processors don’t have the horsepower to handle the advanced Layer 7 functionality, and the ACE Modules don’t have x86 at all. The ACE 4710 Appliance has an x86 core, but it’s several generations back (it’s seriously a single Pentium 4 with one core). As Greg Ferro mentioned, they could be transitioning completely away from that dead-end hardware platform, and going all virtualized x86. That would make a lot more sense, and would allow Cisco to add features that it desperately needs.

But for now, I’m treating the ACE as dead.

RIP ACE

Oh don’t be like that ACE, you had to know it was coming

Looks like the rumor was true, and it’s not just the ACE30 Service Module: Cisco will stop developing the ACE load balancers. The article quotes a statement from Cisco that includes this:

…Cisco has decided it will not develop further generations of its ACE load-balancing products.

I wonder if that means they won’t even bother to release the vACE or the Nexus 7000 Service Module (both of which have been mentioned in Cisco Live! presentations I believe).

Not sure what this means for the CCIE Data Center either. I think it would be relatively easy to strip the ACE out. It doesn’t appear to be a key component, just sort of tacked on anyway. I used to joke that the CCIE Data Center exam would be more relevant if it included F5’s LTM. We’ll see.

Rumor: Cisco To Stop Selling ACE?

Update 9/17/12: It’s true. The Cisco ACE is dead.

Filed under things that make you go Hrmm…. I saw this on @IPv6freely’s (Chris Jones) twitter feed, and article in Barron’s stating that Cisco has told its sales people to stop selling the ACE application delivery controller load balancer.

The article mentions specifically the ACE30 module, the current service module. It makes no mention of the ACE 4710 appliance. Also, it’s just a rumor, so while interesting, certainly nothing definitive.

My speculation? Of course, it could be utter bullshit. I haven’t found or heard anything to substantiate it. Though even if it were true, it wouldn’t necessarily mean Cisco has given up on ACE. It could signal that Cisco is no longer interested in selling the ACE30 service module, preferring instead the ACE 4710 appliance and/or gearing up for a service module for the Nexus 7000 series. They could be making a move to go all virtual, with the vACE to possibly be announced shortly. (I heard November 2012, but just a rumor.)

Less likely, but certainly possible, is that Cisco is going to drop the ACE. It seems particularly unlikely given that the ACE was featured in the CCIE Data Center lab blueprint. However, the lab exam was moved to December, it could be they’re re-tooling it for an ACE-less lab (the ACE looked to be a relatively minor part of the lab anyway).

The ACE doesn’t have many fans outside of Cisco (or even inside, honestly). Though I wouldn’t say the ACE is a bad load balancer. It does what it’s supposed to do, and it does it relatively well. It’s just that it’s been… disappointing. It’s been a bit of a disappointment, in terms of market share and features. The ACE’s market share continues to drop, and in a competitive environment (F5, A10, Citrix NetScaler, etc.) ACE just can’t go toe-to-toe in features (especially against something like iRules/aFlex, FIPS, IPv6, etc.).

Tony, I find your lack of faith in ACE disturbing

So we’ll wait and see.

Cisco ACE 101: Tony’s 5 Steps to a Happy VIP

I’ve been teaching Cisco ACE for over four years now, and I developed a quick trick/check list to teach students the minimum configuration to get a virtual service (VIP) up and running. And since the CCIE Data Center lab will soon be upon us, I’m sharing this little trick with you. I call it “Tony’s 5 Steps to a Happy VIP”. And here it is:

Step #1: ACL
Step #2: class-map: Defines the VIP address and port
Step #3: policy-map: Which server farm(s) do we send traffic to
Step #4: policy-map: Multi-match, will pair every class-map to its policy-map
Step #5: service-policy: Apply step #4 to the VLAN interface

Using that checklist, you can quickly troubleshoot/understand most ACE configurations. So what does that list mean?

First off, let’s define what a VIP even is: In load balancing terms, it refers to an IP and TCP or UDP port combination. In that regard, it’s a bit of a misnomer, since VIP is an acronym for “Virtual IP”, and only implies an IP address. Depending on the vendor, a VIP can be called a “Virtual Server”, “Virtual Service”, although it’s commonly referred to simply as “VIP”. It’s whatever you point the firehouse of network traffic to.

I’m not anti-GUI (in fact, I think the GUI is increasingly necessary in the network world), but in the case of the ACE (and CCIE DC) you’re going to want to use the CLI. It’s just faster, and you’re going to feel the need for speed in that 8 hour window. Also, when things go wrong, the CLI (and config file) is going to allow you to troubleshoot much more quickly than the GUI in the case of the ACE.

The CLI for Cisco ACE can be a little overwhelming. For some reason, Cisco decided to use the Modular QoS CLI (MQC) configuration framework. To me, it seems overly complicated.  Other vendors have CLIs that tend to make a lot more sense, or at least is a lot easier to parse with your eyes. If you’re familiar with class-maps, policy-maps, and service-policies, the transition to the ACE CLI won’t be all that difficult. It works very similar to setting up QoS. However, if you’re new to MQC, it’s going to be a bit of a bumpy ride.

How I felt learning MQC for the first time

The Configuration

Here is a very basic configuration for an ACE:

access-list ANYANY line 10 extended permit ip any any 

rserver host SERVER1 ip address 192.168.10.100
  inservice 
rserver host SERVER2 ip address 192.168.10.101 
  inservice 
rserver host SERVER3 ip address 192.168.10.101 
  inservice

serverfarm host SERVERFARM1
  rserver SERVER1
    inservice
  rserver SERVER2
    inservice
  rserver SERVER3
    inservice 

class-map match-all VIP1-80 
  2 match virtual-address 192.168.1.200 tcp eq http

class-map match-all VIP1-443
  2 match virtual-address 192.168.1.200 tcp eq https

policy-map type loadbalance first-match VIP1-POLICY
  class class-default 
    serverfarm SERVERFARM1 

policy-map multi-match CLIENT-VIPS 
  class VIP1-80
    loadbalance vip inservice 
    loadbalance policy VIP1-POLICY
  class VIP1-443
    loadbalance vip inservice
    loadbalance policy VIP1-POLICY

interface vlan 200 
  description Client-facing interface 
  ip address 192.168.1.10 255.255.255.0 
  access-group input ANYANY
  service-policy input CLIENT-VIPS 
  no shutdown
interface vlan 100
  description Server VLAN
  ip address 192.168.10.1 255.255.255.0
  no shutdown

Step #1: ACL

It’s not necessarily part of the VIP setup, but you do need to have an ACL rule in before a VIP will work. The reason is that the ACE, unlike most load balancers, is deny all by default. Without an ACL you can’t pass any traffic through the ACE. (However, ACLs have no effect on traffic to the ACE for management.)

Many an ACE configuration problem has been caused by forgetting to put an ACL rule in. My recommendation? Even if you plan on using specific ACLs, start out with an “any/any” rule.

access-list ANYANY line 10 extended permit ip any any

And don’t forget to put them on the interface facing the client (outside VLAN).

interface vlan 200 
  description Client-facing interface 
  ip address 192.168.1.10 255.255.255.0 
  access-group ANYANY input 
  service-policy input CLIENT-VIPS 
  no shutdown

Once you get everything working, then you can make a more nailed-down ACL if required, although most don’t since there is likely a firewall in place anyway (even the Cisco example configurations typically only have an any-any rule in place).

If you do use a more specific ACL, it’s often a good idea to switch back to any-any for troubleshooting. Put the more specific rule in place only when you’re sure your config works.

Step #2: class-map (VIP declaration)

The next step is to create a class-map that will catch traffic destined for the VIP. You should always include an IP address as well as a single TCP or UDP port. I’ve seen configurations that match any TCP/UDP port on a specific IP address, and this is usually a really, really bad idea.

class-map match-all VIP1-80
  2 match virtual-address 192.168.1.200 tcp eq http

This defines a VIP with an address of 192.168.1.200 on port http (port 80). Even if you set up multiple ports on the same IP address, such as port 80 and 443, use different class-maps and configure them separately.

Step #3: policy-map (what do we do with traffic hitting the VIP)

Here is where the VIP is defined as either a Layer 4 VIP or a Layer 7 VIP. The example below is a simple Layer 4 VIP (the ACE is not aware of anything that happens above Layer 4). You can get a lot fancier in this section, such as sending certain matched traffic to one server farm, and other traffic to others, and/or setting up persistence. Again, this is the most basic configuration.

policy-map type loadbalance first-match VIP1-POLICY
  class class-default <-- This matches everything
    serverfarm SERVERFARM1 <-- And sends it all right here

Step #4: policy-map (round-up policy-map, pairs a VIP with a decision process, and all the pairs are joined into a single statement)

You will typically have multiple Step 2’s and Step 3’s, but they exist as independent declarations so you’ll need something to round them all up into a single place and join them. In most configurations, you will typically only have one multi-match policy-map. This multi-match is where you marry a Step 2 class-map to a Step 3 policy-map. In this example, two separate class-maps use the same policy-map (which is fine).

policy-map multi-match CLIENT-VIPS 
  class VIP1-80 <-- This VIP...
    loadbalance vip inservice 
    loadbalance policy VIP1-POLICY <-- ...sends traffic to this policy
  class VIP1-443 <-- This VIP...
    loadbalance vip inservice
    loadbalance policy VIP1-POLICY <-- ...sends traffic to this policy

Step #5: service-policy (apply the round-up to the client-facing interface)

Finally, for any of this to work, you’ll need to apply the Step 4 multi-match policy-map to a VLAN interface, the one that faces the client.
interface vlan 200 

 description Client-facing interface 
 ip address 192.168.1.10 255.255.255.0 
 access-group input ANYANY <-- Step 1's ACL is applied
 service-policy input CLIENT-VIPS <-- Step 5's multi-match policy map is applied
 no shutdown <-- Don't forget the no shut!

Hope this helps with demystifying the ACE configuration. A short little check list can really help save time, especially in a time-constrained environment like a CCIE lab.

Cisco ACE: Insert Client IP Address

Source-NAT (also referred to as one-armed mode) is a common way of implementing load balancers into a network. It has several advantages over routed-mode (where the load balancer is the default gateway of the servers), most importantly that the load balancer doesn’t need to be Layer 2 adjacent/on the same subnet as the servers.  As long as the SNAT IP address of the load balancer has bi-directional communication with the IP address of the servers, the load balancer can be anywhere. A different subnet, a different data center, even a different continent.

However, one drawback is that with Source NAT the client’s IP address is obscured. The server’s logs will show only the IP address of the SNAT address(s).

There is a way to remedy that if the traffic is HTTP/HTTPS, and that’s by having the load balancer insert the true source IP address into the HTTP request header from the client. You can do it with the ACE by putting it into the load balance policy-map.

policy-map type loadbalance http first-match VIP1_L7_POLICY
  class class-default
     serverfarm FARM1
     insert-http x-forwarded-for header-value "%is"

But alone is not enough. There are two extra steps you need to take.

The first step is you need to tell the web server to log the x-forwarded-for. For Apache, it’s a configuration file change. For IIS, you need to run an ISAPI filter in IIS.

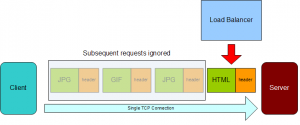
The other thing you need to do is fix the ACE’s attention span. You see, by default the ACE has a short attention span. The HTTP protocol allows you to make multiple HTTP requests on a single TCP connection. By default, the ACE will only evaluate/manipulate the first HTTP request in a TCP connection.

So your log files will look like this:

1.1.1.1 "GET /lb/archive/10-2002/index.htm"
- "GET /lb/archive/10-2003/index.html"
- "GET /lb/archive/05-2004/0100.html HTTP/1.1"
2.2.2.2 "GET /lb/archive/10-2007/0010.html"
- "GET /lb/archive/index.php"
- "GET /lb/archive/09-2002/0001.html"

The “-” indicates Apache couldn’t find the header, because the ACE didn’t insert it. The ACE did add the first source IP address, but every request after it in the same TCP connection was ignored.

Why does the ACE do this? It’s less work for one, only evaluating/manipulating the first request in a connection. Since browsers will make dozens or even hundreds of requests over a single connection, this would be  a significant saving of resources. After all, most of the time when L7 configurations are used, it’s for cookie-based persistence. If that’s the case, all the requests in the same TCP connection are going to contain the same cookies anyway.

How do you fix it? By using a very ill-named feature called persistence-rebalance. This gives the ACE a longer attention span, telling the ACE to look at every HTTP request in the TCP connection.

First, create an HTTP parameter-map.

parameter-map type http HTTP_LONG_ATTENTION_SPAN
  persistence-rebalance

Then apply the parameter-map to the VIP in the multi-match policy map.

policy-map multi-match VIPsOnInterface
  class VIP1
    loadbalance vip inservice
    loadbalance policy VIP1_L7_POLICY
    appl-parameter http advanced-options HTTP_LONG_ATTENTION_SPAN

When that happens, the IP address will show up in all of the log entries.

1.1.1.1 "GET /lb/archive/10-2002/index.htm"
2.2.2.2 "GET /lb/archive/10-2003/index.html"
1.1.1.1 "GET /lb/archive/05-2004/0100.html HTTP/1.1"
2.2.2.2 "GET /lb/archive/10-2007/0010.html"
1.1.1.1 "GET /lb/archive/index.php"
2.2.2.2 "GET /lb/archive/09-2002/0001.html"

But remember, configuring the ACE (or load balancer in general) isn’t the only step you need to perform. You also need to tell the web service (Apache, Nginx, IIS) to use the header as well. None of them automatically use the X-Forwarded-for header.

I don’t know if they’ll try to trick you with this in the CCIE Lab, but it’s something to keep in mind for the CCIE and for implementations.

Health Checking On Load Balancers: More Art Than Science

One of the trickiest aspects of load balancing (and load balancing has lots of tricky aspects) is how to handle health checking. Health checking is of course the process where by the load balancer (or application delivery controller) does periodic checks on the servers to make sure they’re up and responding. If a server is down for any reason, the load balancer should detect this and stop sending traffic its way.

Pretty simple functionality, really. Some load balancers call it keep-alives or other terms, but it’s all the same: Make sure the server is still alive.

One of the misconceptions about health checking is that it can instantly detect a failed server. It can’t. Instead, a load balancer can detect a server failure within a window of time. And that window of time is dependent upon a couple of factors:

  • Interval (how often is the health check performed)
  • Timeout (how often does the load balancer wait before it gives up)
  • Count (some load balancers will try several times before marking a server as “down”)

As an example, take a very common interval setting of 15 seconds, a timeout of 5 seconds, and a count of 2. If I took a shotgun to a server (which would ensure that it’s down), how long would it take the load balancer to detect the failure?

In the worst case scenario for time to detection, the failure occurred right after that last successful health check, so that would be about 14 seconds before the first failure was even detected. The health check fails once, so we wait another 15 seconds before the second health check. Now that’s two down, and we’ve got a server marked as down.

So that’s about 29 seconds at a worst case scenario, or 16 seconds on a best case scenario. Sometimes server administrators hear that and want you to tune the variables down, so they can detect a failure quicker. However, that’s about as low as they go.

If you set the interval for more than 15 seconds, depending on the load balancer, it can unduly burden the control plane processor with all those health checks. This is especially true if you have hundreds of servers in your server farm. You can adjust the count down to 1, which is common, but remember a server would be marked down on just a single health check failure.

I see you have failed a single health check. Pity.

The worst value to tune down, however, is the timeout value. I had a client once tell me that the load balancer was causing all sorts of performance issues in their environment. A little bit of investigating, and it turned out that they had set the timeout value to 1 second. If a server didn’t come up with the appropriate response to the health check in 1 second, the server would be marked down. As a result, every server in the farm was bouncing up and down more than a low-rider in a Dr Dre video.

As a result, users where being bounced from one server to another, with lots of TCP RSTs and re-logging in (the application was stateful, requiring users being tied to a specific server to keep their session going). Also, when one server took 1.1 seconds to respond, it was taken out of rotation. The other servers would have to pick up the slack, and thus had more load. It wasn’t long before one of them took more than a second to respond. And it would cascade over and over again.

When I talked to the customer about this, they said they wanted their site to be as fast as possible, so they set the timeout very low. They didn’t want users going onto a slow server. A noble aspiration, but the wrong way to accomplish that goal. The right way would be to add more servers. We tweaked the timeout value to 5 seconds (about as low as I would set it), and things calmed down considerably. The servers were much happier.

So tweaking those knobs (interval, timeout, count) are always a compromise between detecting a server failure quickly, and giving a server a decent chance to respond as well as not overwhelming the control plane. As a result, it’s not an exact science. Still, there are guidelines to keep in mind, and if you set the expectations correctly, the server/application team will be a lot happier.

Creating Your Own SSL Certificate Authority (and Dumping Self Signed Certs)

Jan 11th, 2016: New Year! Also, there was a comment below about adding -sha256 to the signing (both self-signed and CSR signing) since browsers are starting to reject SHA1. Added (I ran through a test, it worked out for me at least).

November 18th, 2015: Oops! A few have mentioned additional errors that I missed. Fixed.

July 11th, 2015: There were a few bugs in this article that went unfixed for a while. They’ve been fixed.

SSL (or TLS if you want to be super totally correct) gives us many things (despite many of the recent shortcomings).

  • Privacy (stop looking at my password)
  • Integrity (data has not been altered in flight)
  • Trust (you are who you say you are)

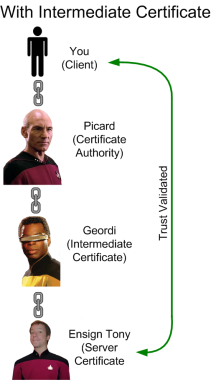
All three of those are needed when you’re buying stuff from say, Amazon (damn you, Amazon Prime!). But we also use SSL for web user interfaces and other GUIs when  administering devices in our control. When a website gets an SSL certificate, they typically purchase one from a major certificate authority such as DigiCert, Symantec (they bought Verisign’s registrar business), or if you like the murder of elephants and freedom, GoDaddy.  They range from around $12 USD a year to several hundred, depending on the company and level of trust. The benefit that these certificate authorities provide is a chain of trust. Your browser trusts them, they trust a website, therefore your browser trusts the website (check my article on SSL trust, which contains the best SSL diagram ever conceived).

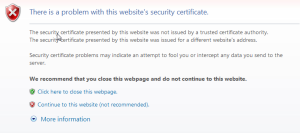
Your devices, on the other hand, the ones you configure and only your organization accesses, don’t need that trust chain built upon the public infrastrucuture. For one, it could get really expensive buying an SSL certificate for each device you control. And secondly, you set the devices up, so you don’t really need that level of trust. So web user interfaces (and other SSL-based interfaces) are almost always protected with self-signed certificates. They’re easy to create, and they’re free. They also provide you with the privacy that comes with encryption, although they don’t do anything about trust. Which is why when you connect to a device with a self-signed certificate, you get one of these: So you have the choice, buy an overpriced SSL certificate from a CA (certificate authority), or get those errors. Well, there’s a third option, one where you can create a private certificate authority, and setting it up is absolutely free.

OpenSSL

OpenSSL is a free utility that comes with most installations of MacOS X, Linux, the *BSDs, and Unixes. You can also download a binary copy to run on your Windows installation. And OpenSSL is all you need to create your own private certificate authority. The process for creating your own certificate authority is pretty straight forward:

  1. Create a private key
  2. Self-sign
  3. Install root CA on your various workstations
Once you do that, every device that you manage via HTTPS just needs to have its own certificate created with the following steps:
  1. Create CSR for device
  2. Sign CSR with root CA key
You can have your own private CA setup in less than an hour. And here’s how to do it.

Create the Root Certificate (Done Once)

Creating the root certificate is easy and can be done quickly. Once you do these steps, you’ll end up with a root SSL certificate that you’ll install on all of your desktops, and a private key you’ll use to sign the certificates that get installed on your various devices.

Create the Root Key

The first step is to create the private root key which only takes one step. In the example below, I’m creating a 2048 bit key:

openssl genrsa -out rootCA.key 2048

The standard key sizes today are 1024, 2048, and to a much lesser extent, 4096. I go with 2048, which is what most people use now. 4096 is usually overkill (and 4096 key length is 5 times more computationally intensive than 2048), and people are transitioning away from 1024. Important note: Keep this private key very private. This is the basis of all trust for your certificates, and if someone gets a hold of it, they can generate certificates that your browser will accept. You can also create a key that is password protected by adding -des3:

openssl genrsa -des3 -out rootCA.key 2048

You’ll be prompted to give a password, and from then on you’ll be challenged password every time you use the key. Of course, if you forget the password, you’ll have to do all of this all over again.

The next step is to self-sign this certificate.

openssl req -x509 -new -nodes -key rootCA.key -sha256 -days 1024 -out rootCA.pem

This will start an interactive script which will ask you for various bits of information. Fill it out as you see fit.

You are about to be asked to enter information that will be incorporated
into your certificate request.
What you are about to enter is what is called a Distinguished Name or a DN.
There are quite a few fields but you can leave some blank
For some fields there will be a default value,
If you enter '.', the field will be left blank.
-----
Country Name (2 letter code) [AU]:US
State or Province Name (full name) [Some-State]:Oregon
Locality Name (eg, city) []:Portland
Organization Name (eg, company) [Internet Widgits Pty Ltd]:Overlords
Organizational Unit Name (eg, section) []:IT
Common Name (eg, YOUR name) []:Data Center Overlords
Email Address []:none@none.com

Once done, this will create an SSL certificate called rootCA.pem, signed by itself, valid for 1024 days, and it will act as our root certificate. The interesting thing about traditional certificate authorities is that root certificate is also self-signed. But before you can start your own certificate authority, remember the trick is getting those certs in  every browser in the entire world.

Install Root Certificate Into Workstations

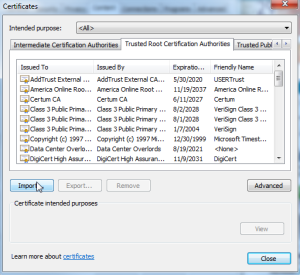
For you laptops/desktops/workstations, you’ll need to install the root certificate into your trusted certificate repositories. This can get a little tricky. Some browsers use the default operating system repository. For instance, in Windows both IE and Chrome use the default certificate management.  Go to IE, Internet Options, go to the Content tab, then hit the Certificates button. In Chrome going to Options and Under The Hood, and Manage certificates. They both take you to the same place, the Windows certificate repository. You’ll want to install the root CA certificate (not the key) under the Trusted Root Certificate Authorities tab. However, in Windows Firefox has its own certificate repository, so if you use IE or Chrome as well as Firefox, you’ll have to install the root certificate into both the Windows repository and the Firefox repository. In a Mac, Safari, Firefox, and Chrome all use the Mac OS X certificate management system, so you just have to install it once on a Mac. With Linux, I believe it’s on a browser-per-browser basis.

Create A Certificate (Done Once Per Device)

Every device that you wish to install a trusted certificate will need to go through this process. First, just like with the root CA step, you’ll need to create a private key (different from the root CA).

openssl genrsa -out device.key 2048

Once the key is created, you’ll generate the certificate signing request.

openssl req -new -key device.key -out device.csr

You’ll be asked various questions (Country, State/Province, etc.). Answer them how you see fit. The important question to answer though is common-name.

Common Name (eg, YOUR name) []: 10.0.0.1

Whatever you see in the address field in your browser when you go to your device must be what you put under common name, even if it’s an IP address.  Yes, even an IP (IPv4 or IPv6) address works under common name. If it doesn’t match, even a properly signed certificate will not validate correctly and you’ll get the “cannot verify authenticity” error. Once that’s done, you’ll sign the CSR, which requires the CA root key.

openssl x509 -req -in device.csr -CA rootCA.pem -CAkey rootCA.key -CAcreateserial -out device.crt -days 500 -sha256

This creates a signed certificate called device.crt which is valid for 500 days (you can adjust the number of days of course, although it doesn’t make sense to have a certificate that lasts longer than the root certificate). The next step is to take the key and the certificate and install them in your device. Most network devices that are controlled via HTTPS have some mechanism for you to install. For example, I’m running F5’s LTM VE (virtual edition) as a VM on my ESXi 4 host. Log into F5’s web GUI (and should be the last time you’re greeted by the warning), and go to System, Device Certificates, and Device Certificate. In the drop down select Certificate and Key, and either past the contents of the key and certificate file, or you can upload them from your workstation.

After that, all you need to do is close your browser and hit the GUI site again. If you did it right, you’ll see no warning and a nice greenness in your address bar.

And speaking of VMware, you know that annoying message you always get when connecting to an ESXi host?

You can get rid of that by creating a key and certificate for your ESXi server and installing them as /etc/vmware/ssl/rui.crt and /etc/vmware/ssl/rui.key.